Welcome to the comprehensive guide for assembling your Dorel Home Products loft bed. This manual provides step-by-step instructions to ensure a smooth and safe assembly process. With detailed diagrams and clear instructions‚ you’ll be able to transform your space efficiently. Designed for durability and functionality‚ Dorel loft beds offer a perfect blend of style and practicality. Follow this guide carefully to enjoy a sturdy and comfortable bed that meets your needs.
Overview of Dorel Home Products Loft Beds
Dorel Home Products loft beds are designed to combine functionality‚ durability‚ and style‚ offering space-saving solutions for bedrooms. These beds are crafted with sturdy materials and feature safety elements like guardrails and ladders for easy access. Available in various models‚ including those with desks or storage options‚ they cater to diverse needs. Dorel Industries‚ a leader in home furnishings‚ ensures quality and reliability. Their loft beds are ideal for children and adults‚ providing a comfortable and practical sleeping solution. With a focus on safety and design‚ these beds are perfect for maximizing space while maintaining a modern aesthetic. They are backed by a 1-year limited warranty for added peace of mind.
Importance of Following Assembly Instructions
Following the assembly instructions for your Dorel Home Products loft bed is crucial for ensuring safety‚ stability‚ and proper functionality. The provided manual contains detailed steps‚ safety guidelines‚ and warranty information to help you assemble the bed correctly. Skipping or misinterpreting instructions can lead to structural issues‚ potential hazards‚ or voiding the warranty. Always verify that all components are included and undamaged before starting. Use the recommended tools and follow the sequence carefully to avoid errors. Proper assembly ensures the bed meets weight capacity standards and provides a secure environment for users. Taking the time to follow instructions carefully will result in a sturdy‚ reliable‚ and safe loft bed for years to come.

Preparation for Assembly
Gather all tools and materials‚ clear a spacious work area‚ and review the manual thoroughly. Ensure all parts are accounted for and undamaged before starting.
Tools and Materials Needed
To assemble your Dorel Home Products loft bed‚ you’ll need specific tools and materials. Essential tools include a screwdriver (both Phillips and flathead)‚ an Allen wrench‚ a socket wrench‚ pliers‚ and a rubber mallet. Ensure you have all hardware provided‚ such as bolts‚ screws‚ washers‚ and nuts. Additional materials like a ladder or step stool may be helpful for reaching higher sections. Verify all components against the parts list to identify any missing or damaged items. Organize tools and parts in a clear workspace to streamline the assembly process. Optional items‚ like a storage bin for small hardware‚ can keep things tidy and prevent losing parts. Proper preparation ensures a smooth and efficient assembly experience.
Unpacking and Organizing Components
Begin by carefully unpacking all components from the box to avoid damage. Check for any signs of damage or wear during shipping. Inside‚ you’ll find the bed frame parts‚ hardware (bolts‚ screws‚ etc.)‚ and instruction manual. Compare the contents with the provided parts list to ensure everything is included. Organize components by category‚ such as frame sections‚ support slats‚ and hardware‚ to streamline assembly. Use a clean‚ flat workspace to lay out parts‚ and consider grouping similar hardware together in labeled containers. This step ensures a smooth process and prevents misplaced items. Double-check that all pieces are accounted for before proceeding. A well-organized setup saves time and reduces frustration.

Step-by-Step Assembly Process
Begin with the bed frame‚ attaching legs and support beams. Next‚ secure side rails and guardrails tightly. Then‚ install the ladder and safety features‚ ensuring stability and accessibility. Follow detailed instructions for each step‚ methodically progressing from base to final assembly; Double-check connections for firmness and alignment. If adding a desk or storage‚ integrate these components last. Maintain patience and precision to ensure a sturdy‚ functional loft bed. Always refer back to the manual for specific guidance‚ confirming each part is correctly positioned and secured. Proper sequencing ensures a safe and durable final product. Completion requires attention to detail at every stage.
Assembling the Bed Frame
Begin by placing the bed frame components on a flat‚ stable surface. Identify and align the headboard‚ footboard‚ and side rails. Attach the legs to the frame using the provided screws or bolts‚ ensuring they are tightly secured. Next‚ connect the support beams to the frame for added stability. Use a wrench or screwdriver to tighten all connections firmly. Double-check that all bolts are snug and the frame is level. If the frame has pre-drilled holes‚ align the hardware correctly. Refer to the manual for specific torque requirements. Properly assembling the bed frame is crucial for safety and durability. Take your time to ensure all parts fit seamlessly and the structure is solid before moving on to the next steps.
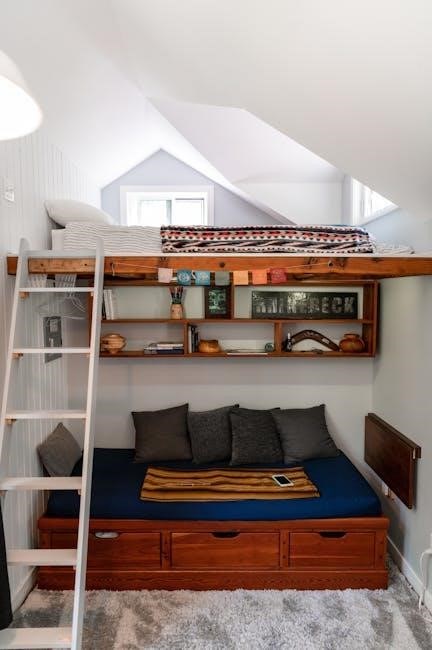
Attaching Side Rails and Guardrails
Once the bed frame is assembled‚ attach the side rails to the headboard and footboard using the provided bolts or screws. Ensure the rails are evenly spaced and aligned properly. Tighten the hardware firmly with a wrench or screwdriver. Next‚ install the guardrails along the open sides of the bed to prevent accidental falls. Align the guardrail brackets with the pre-drilled holes on the side rails and secure them tightly. Double-check that all connections are stable and even. For added safety‚ ensure the guardrails are at least 12 inches above the mattress. Use a level tool to confirm the rails are straight and properly aligned. Follow the manufacturer’s torque specifications for all bolts to ensure maximum stability and safety.
Installing the Ladder and Safety Features
Attach the ladder to the bed frame by aligning the pre-drilled holes on the ladder feet with the corresponding holes on the bed. Secure it using the provided bolts or screws. Tighten firmly with a wrench or screwdriver. Ensure the ladder is at a slight angle for safe climbing. Install safety features like non-slip strips on the ladder rungs and a latch or hook to secure the ladder in place. Double-check that all hardware is tightened to the manufacturer’s specifications. Use a level tool to ensure the ladder is properly aligned and stable. For additional safety‚ ensure the ladder is positioned away from furniture or objects that could obstruct movement. Follow all safety guidelines to prevent accidents.
Additional Features and Customization
Enhance functionality by adding a built-in desk‚ shelves‚ or drawers. Customize the loft bed with adjustable storage units or a trundle bed for extra sleeping space. Personalize the design with decals or curtains for a unique look‚ ensuring it matches your room decor while maintaining practicality.
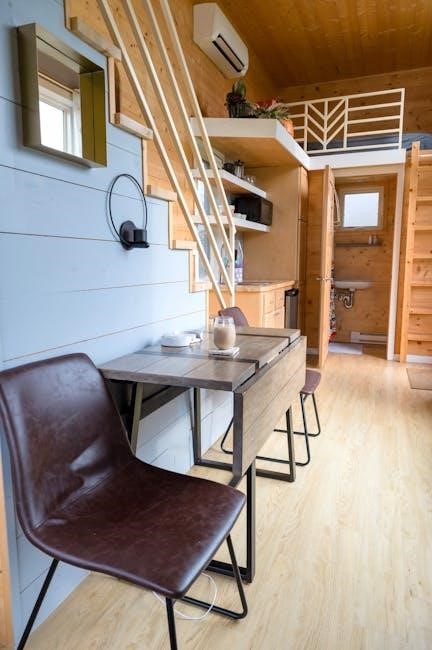
Adding a Desk or Storage Options
Maximize space by incorporating a desk or storage solutions into your loft bed setup. A built-in desk provides a convenient workspace‚ while shelves or drawers offer ample storage for personal items. Consider adding baskets or bins under the bed for additional organization. Ensure all components are securely attached and aligned with the bed frame for stability. Measure your space carefully to choose the right size and style of desk or storage units. Follow the manufacturer’s guidelines for weight limits to maintain safety and structural integrity. Customizing your loft bed with functional additions enhances its versatility and makes it a practical centerpiece for any room.
Securing the Bed to the Wall for Stability
To ensure your loft bed remains stable and safe‚ secure it to the wall. Locate the wall studs behind the bed and use the provided hardware or sturdy brackets to anchor the bed frame. Drill screws into the studs to prevent the bed from tipping or shifting. Follow the manufacturer’s instructions for the correct placement and type of fasteners. Double-check that all connections are tight and can support the bed’s weight capacity. Securing the bed to the wall adds an extra layer of safety‚ especially for children or in areas prone to movement. This step is crucial for maintaining structural integrity and preventing accidents.

Safety Precautions and Maintenance
Always follow weight capacity guidelines and ensure the bed is used correctly. Regularly inspect for loose bolts and clean debris. Supervise children during use and avoid overcrowding.
Weight Capacity and Safety Guidelines
Adhere strictly to the specified weight capacity to ensure stability and prevent structural damage. Ensure the bed is assembled correctly to support the maximum load safely. Always supervise children during use‚ especially near the ladder or guardrails. Avoid overloading the bed‚ as this can compromise safety. Regularly inspect the bed for wear and tear‚ addressing any issues promptly. Position the bed away from windows or fragile objects to minimize accident risks. Follow all safety guidelines provided in the manual to maintain durability and prevent potential hazards. Proper maintenance ensures the loft bed remains a secure and functional space for years to come.
Periodic Tightening of Bolts and Screws
Regularly inspect and tighten all bolts and screws to ensure the loft bed remains stable and secure. Over time‚ vibrations and daily use can cause fasteners to loosen‚ potentially leading to structural instability. Use the tools provided or recommended in the manual to check for any loose connections. Tighten all hardware firmly‚ but avoid over-tightening‚ which might damage the components. Pay particular attention to joints‚ ladder attachments‚ and guardrail connections‚ as these areas are subject to the most stress. Schedule periodic checks every 2-3 months or after moving the bed to maintain safety and longevity. This simple maintenance step can prevent accidents and extend the lifespan of your Dorel Home Products loft bed.

Warranty and Support
Dorel Home Products offers a 1-year limited warranty covering manufacturing defects. Customer support is available for assistance‚ and additional resources can be found online.
Understanding the 1-Year Limited Warranty
Dorel Home Products provides a 1-year limited warranty for their loft beds‚ covering manufacturing defects in materials and workmanship. This warranty applies from the date of purchase and is valid only for the original buyer. It ensures that any defective parts will be repaired or replaced at no additional cost. However‚ the warranty does not cover damage caused by misuse‚ normal wear and tear‚ or improper assembly. To make a claim‚ customers must contact customer service and provide proof of purchase. The warranty is a assurance of quality‚ giving buyers peace of mind with their investment in a Dorel Home Products loft bed.
Registering Your Product and Customer Support
Registering your Dorel Home Products loft bed is a simple process that ensures warranty validation and personalized support. Visit the official Dorel website‚ navigate to the support section‚ and fill out the registration form with details like product serial number‚ purchase date‚ and contact information. This step helps verify ownership and streamline any future assistance. For inquiries or issues‚ Dorel offers customer support through phone‚ email‚ or live chat. Their website also provides a dedicated support portal with FAQs and downloadable resources. Registering your product and utilizing customer support ensures a smooth experience and quick resolution of any concerns related to your loft bed.
Additional Resources
Dorel Home Products offers comprehensive resources‚ including downloadable assembly guides and video tutorials‚ to assist with loft bed assembly and customization for a seamless experience.
Accessing Online Manuals and Videos
Dorel Home Products provides easy access to online manuals and instructional videos to ensure a smooth assembly process. Visit their official website or support page to download detailed PDF guides specific to your loft bed model. Additionally‚ video tutorials are available on their YouTube channel or product page‚ offering step-by-step visual guidance. These resources are designed to complement the physical instructions‚ helping you navigate complex steps with clarity. For optimal viewing‚ use a stable internet connection and consider fullscreen mode for better visibility. By leveraging these digital tools‚ you can assemble your loft bed confidently and efficiently‚ ensuring safety and proper construction.
Using AI Chat for Assembly Assistance
Dorel Home Products Loft Bed Instructions can now be supported by AI chat services like ChatGPT or Google Bard for real-time assembly guidance. These AI tools can interpret your questions‚ provide step-by-step explanations‚ and offer solutions for confusing parts of the manual. Simply describe where you’re stuck‚ and the AI will generate clear‚ actionable advice. For example‚ if you’re unsure about attaching the ladder‚ the AI can break down the process into simpler steps. Additionally‚ AI can help troubleshoot issues like missing parts or misaligned pieces‚ saving you time and frustration. This modern resource complements traditional manuals‚ making assembly more accessible and user-friendly for everyone.

Troubleshooting Common Issues
Identify common issues during assembly‚ such as missing parts or misalignment. Refer to the manual or AI chat for guidance and solutions to ensure stability and safety.
Identifying Missing Parts or Damaged Components
Begin by cross-referencing the inventory list with the components provided. Check for missing items or visible damage‚ such as dents‚ scratches‚ or bent metal. If parts are missing‚ verify the packaging thoroughly to ensure they weren’t overlooked. For damaged components‚ contact Dorel Home Products customer support immediately. Provide clear details about the issue‚ including photos if possible‚ to expedite the replacement process. Avoid proceeding with assembly if critical parts are missing or damaged‚ as this could compromise the bed’s stability and safety. Keep all original packaging until the issue is resolved to ensure smooth handling of replacements.
Resolving Assembly Challenges
If you encounter difficulties during assembly‚ start by reviewing the instructions carefully. Ensure all parts are correctly aligned and that no bolts or screws are over-tightened‚ as this could strip threads or damage components. If a piece doesn’t fit‚ double-check its orientation or refer to the diagram. For unclear steps‚ visit the Dorel Home Products website for additional resources‚ such as assembly videos or FAQs. If issues persist‚ contact customer support for guidance or replacement parts. Patience and systematic troubleshooting are key to resolving challenges efficiently. Avoid forcing parts together‚ as this could cause permanent damage to the bed frame or related components.

Final Inspection and Completion
After assembly‚ inspect all connections to ensure stability and safety. Verify that all bolts are tightened and no parts are loose. Double-check the ladder and guardrails for proper alignment. Clean any debris or packaging materials. Once everything is secure‚ your Dorel Home Products loft bed is ready for use. Perform a final walk-through to confirm all components are correctly assembled and functioning as intended. This step ensures durability and safety for years to come.
Ensuring All Parts Are Securely Assembled
Once the loft bed is fully assembled‚ conduct a thorough inspection to ensure all parts are securely fastened. Check the frame‚ side rails‚ and guardrails for proper alignment and tightness. Verify that all bolts and screws are snug but not over-tightened‚ as this could damage the material. Gently rock the bed from side to side to test its stability and make adjustments if necessary. Inspect the ladder for secure attachment and ensure all rungs are evenly spaced. Double-check that all safety features‚ such as guardrails‚ are firmly in place. If any part feels unstable‚ refer back to the instructions or contact customer support for assistance. A secure assembly ensures safety and durability for years of use.
Final Safety Check Before Use
Before allowing anyone to use the loft bed‚ perform a final safety check. Ensure the bed is stable and all components are securely assembled. Test the weight capacity by gently applying pressure to the frame. Check that the ladder is firmly attached and all rungs are secure. Verify that guardrails are properly installed and there are no gaps that could pose a risk. Inspect for any sharp edges or protruding screws. Double-check that all bolts and screws are tightened according to the instructions. Supervise children during initial use and teach them how to climb safely. This final check ensures the bed is safe and ready for use‚ providing peace of mind for years to come.
Successfully assembling your Dorel Home Products loft bed ensures a safe and functional space-saving solution. Following the instructions carefully guarantees a sturdy and reliable product for years of enjoyment.
Benefits of a Properly Assembled Loft Bed
A properly assembled Dorel Home Products loft bed offers numerous benefits‚ including enhanced safety‚ optimal space utilization‚ and a sleek‚ modern design. It provides a sturdy sleeping area while creating additional space underneath for a desk‚ storage‚ or play area. Correct assembly ensures durability‚ preventing wobbles or structural issues. The bed becomes a focal point in the room‚ combining functionality with style. Proper assembly also ensures all safety features‚ like guardrails and ladders‚ are securely in place‚ giving peace of mind. By following the instructions‚ you maximize the product’s lifespan and create a comfortable‚ organized living environment tailored to your needs.
Enjoying Your New Dorel Home Products Loft Bed
Once assembled‚ your Dorel Home Products loft bed is ready to enhance your living space. It provides a cozy sleeping area while offering practical storage or workspace solutions. The elevated design creates a sense of openness‚ making rooms feel larger. Customization options allow you to personalize the bed to match your decor‚ ensuring it fits seamlessly into your home. The sturdy construction and thoughtful design ensure years of comfort and reliability. By following the instructions‚ you’ve created a functional and stylish centerpiece for any room‚ perfect for relaxation‚ productivity‚ or creativity. Enjoy the satisfaction of a job well done and the benefits of your new loft bed!